Using custom PowerShell Script with SureBackup
Veeam SureBackup is a powerful feature when it comes to backup verification. Out of the box, it can test well know ports and applications like Microsoft SQL Server. You can also add custom scripts built to verify own applications. This post is about using a custom PowerShell script with SureBackup. There is also a sample script included that is able to test if all defined partitions are online.
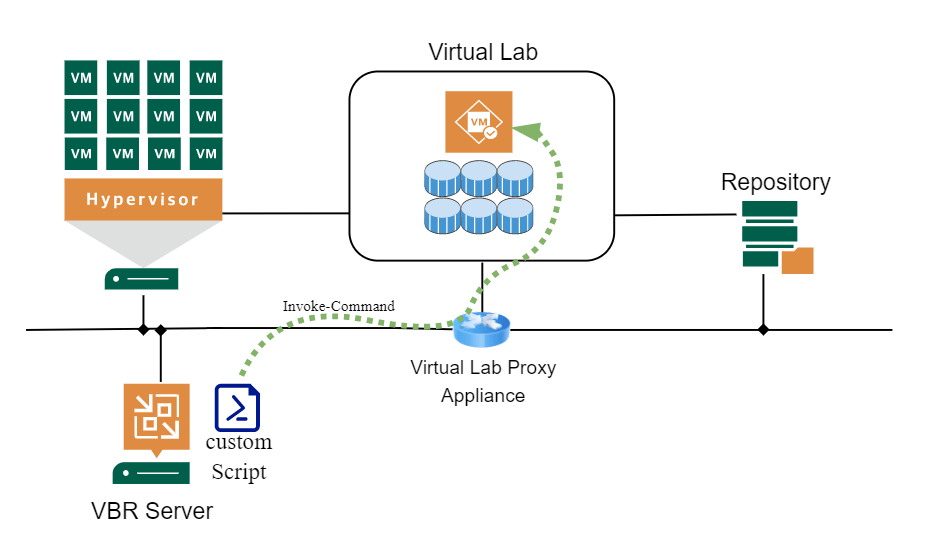
Using a custom PowerShell script with SureBackup sound simpler than it is. This is because, unlike with backup jobs, SureBackup does not push the script into the VM. Script is started on Veeam Backup & Replication (VBR) Server. This makes it more complex. Here are the steps that enable you to use a custom PowerShell script with SureBackup.
1. Write your test script
For verifying an application a test-script is needed. If you are lucky, you can find something that meets your requirements at VeeamHub. If not, write your own script.
My example script checks each defined partition. It does this by testing the existence of a single file of each partition. Of course this can done much more sophisticated, but take it as a starting point.
$Return = 1
$PartitionFile = "c:\SureBackupPartition.txt"
$TestFile = "testfile.txt"

if (Test-Path -Path $PartitionFile) {
	$Partitions = Get-Content $PartitionFile | foreach {$_.Trim()} }
else {
	$Partitions = (Get-Volume | Where-Object {$_.DriveLetter -ne $null -and $_.DriveType -eq "Fixed"}).DriveLetter
}

$Partitions = $Partitions | Where-Object {"" -ne $_}
if ($Null -eq $Partitions) {$Partitions = "C"}

$CheckStatus = 0
$LogError = ""
foreach ($Partition in $Partitions) {
	$TestFileOnPartition = $($Partition + ":\" + $TestFile)
	if (!(Test-Path -Path $TestFileOnPartition)) {
		$CheckStatus = 1
		break
	}
}
if ($CheckStatus -eq 0) {$Return = 0}
$Return
How does it work
Return-code 1 means failure, 0 success. Therefore I start with $Return = 1. So to speak, the test must earn its success. $PartitionFile points to a text file that consists of the drive letters, this VM should have – one per line. This is because it could happen that some volumes are missing during the SureBackup run. And this is exactly what the script should test. Therefore it has to know what partitions should exist. $TestFile points to the file (relative path) that must exist on each partition to be successful. Line [5] – [9] builds the list of partition to check. If $PartitionFile does not exist, current volumes are read. As described before, this is basically not what the script should test. Line [14] – [22] contains the check of $TestFile on each partition.
2. Ensure a secure login
Because the test script isn’t running in the VM to test, it is necessary to handle remote login to VM. The way I use here is to create a XLM file that contains the credential information with encrypted password. To create such a file the following code can be used.
$UserName = ".\Administrator"
$UserPWD =  "Password"
$SecStringPWD = ConvertTo-SecureString $UserPWD -AsPlainText -Force
$CredObject = New-Object System.Management.Automation.PSCredential ($UserName, $SecStringPWD)
$CredObject | Export-Clixml -Path C:\_Script\SureBackup\CredObject.xml
But unfortunately it is not quite so simple! Only the user who encrypted the password – who executed the code – can decrypt it. VBR starts the script in the context of the user that is running VBR services. By default this is the local system account. So credential file has to be created by this user too! Microsoft Sysinternals tool PsExec can help you with that. To start a PowerShell session in the context of system account, run:
PsExec.exe -i -s powershell.exe
This command opens a PowerShell window that can be used to run the code above to create the credential file.
3. Enable remote PowerShell access
To basically enable a server to run PowerShell code on a remote server, this server must be defined as TrustedHost on the host that runs the script. In our case this is the VBR server. If you missed this step, you will see such error:

[192.168.255.61] Connecting to remote server 192.168.255.61 failed with the following error message : The WinRM client cannot process the request. If the authentication scheme is different from Kerberos, or
if the client computer is not joined to a domain, then HTTPS transport must be used or the destination machine must be added to the TrustedHosts configuration setting. Use winrm.cmd to configure TrustedHosts.
Note that computers in the TrustedHosts list might not be authenticated. You can get more information about that by running the following command: winrm help config. For more information, see the
about_Remote_Troubleshooting Help topic.
+ CategoryInfo : OpenError: (192.168.255.61:String) [], PSRemotingTransportException
+ FullyQualifiedErrorId : ServerNotTrusted,PSSessionStateBroken
To add TrustedHosts, run a PowerShell command like this:
Set-Item WSMan:\localhost\Client\TrustedHosts -value IP_address -force
For IP_address use the masquerade address of the VM to test. Asterisk are also possible. So the command:
Set-Item WSMan:\localhost\Client\TrustedHosts -value 192.168.255.* -force
would allow to run remote code on all hosts within network 192.168.255.0/24. To show current TrustedHosts, run:
(Get-Item WSMan:\localhost\Client\TrustedHosts).value
To clear the list, run:
Set-Item WSMan:\localhost\Client\TrustedHosts -value "" -force
4. Write start script
Now we need to create a script that controls the test code. The start script is located and runs on the VBR server.
Param($TestVmIP)
    $ReturnCode = 1
    $CredObject = Import-Clixml -Path C:\_Script\SureBackup\CredObject.xml
    $ReturnCode = Invoke-Command -Credential $CredObject -Computername $TestVmIP -ErrorAction Stop -ScriptBlock
    {

... test script code ...

    }
exit $ReturnCode
How does it work
Script gets parameter data $TestVmIP from VBR. It is variable %vm_ip% as we will see in next step. This is the masquerade IP of the VM to test that is reachable by the VBR server. $CredObject is filled with credential information created in Step 2. Cmdlet Invoke-Command is used to run the code within brackets of parameter -ScriptBlock remotely on -Computername which is our test VM.
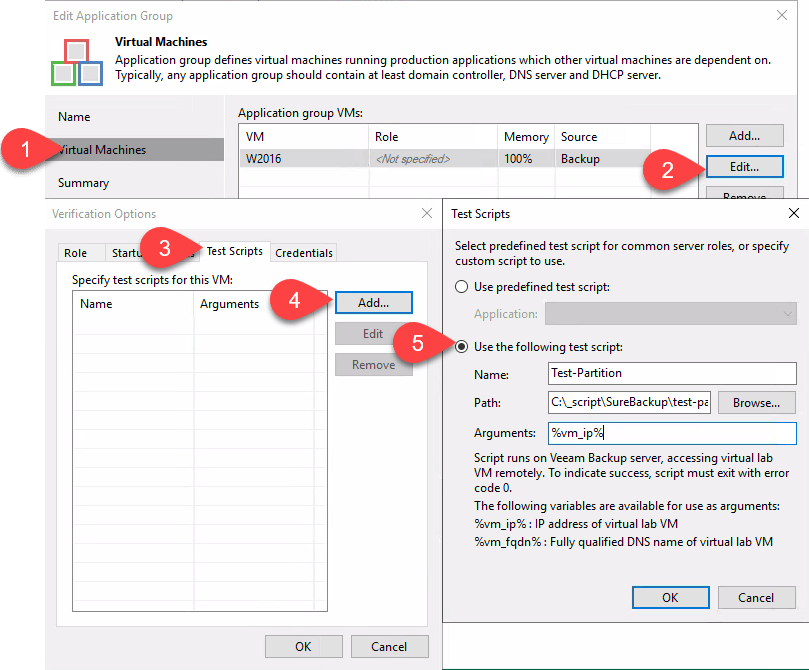
5. Put it all together
Now its time to configure SureBackup to run the custom script. You can configure it for members of an application group or of a linked job. To do so, press the Edit… button for the specific VM, go to Test Script tab, press Add… and select Use the following test script. Fill in Name, browse for your script and use %vm_ip% as Arguments.
6. Test and debug
As you can see, there are a few steps to go through. Each of these steps has some sources of error. Therefore it is essential to test your solution. So test each step for itself. Here are a few tips what and how to test.
Test your script
You should test the test-section of your script on itself. If this works fine, test it embedded in the Invoke-Command cmdlet.
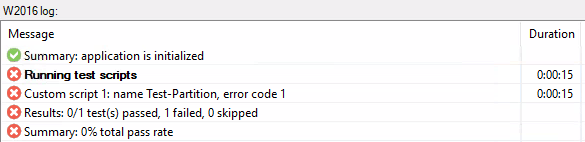
Check log output
When script is not successful – in my example a volume isn’t mounted during SureBackup run – log looks like this:
Keep SureBackup job running
To test your configuration during SureBackup runs, simply keep it running. Use the Keep the application group running after the job completes option beneath Application Group in SureBackup job configuration.

However, if the job fails, this option will be ignored.
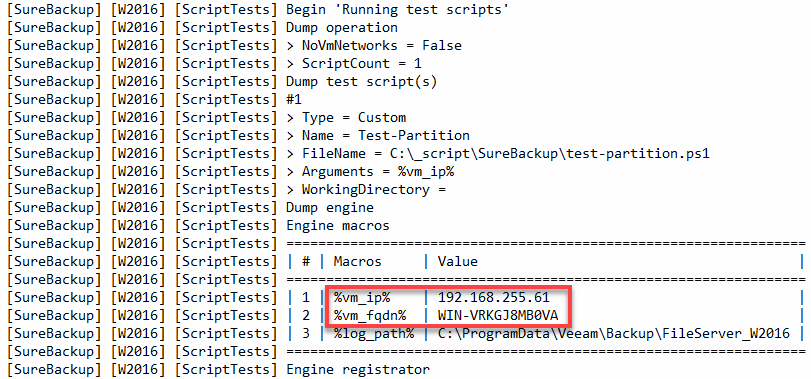
Check log files
The log files you should check – if necessary – are located on VBR server in directory %programdata%\veeam\Backup\SureBackup_JobName. In file Job.SureBackup_JobName.log you find details of script runtime.
Conclusion
SureBackup is even out of the box powerful. When it comes to custom scripts for application verification there are a few pitfalls. I hope this post helps to verify your backup even better by using custom PowerShell script with SureBackup.
Notes
One response to “Using custom PowerShell Script with SureBackup”
Leave a Reply
Veeam Vanguard

Veeam Legend

VMware vExpert
Under section 4 of this article, 2 things:
#1 A note that Param must be the very first part of the script, nothing can be before/above it otherwise an error will occur that says “The term ‘Param’ is not recognized…”
#2 -ScriptBlock, the “{” must be immediately after -ScriptBlock, so like this: “-ScriptBlock{
So the script could look like:
Param($TestVmIP)
$ReturnCode = 1
$CredObject = Import-Clixml -Path C:\_Script\SureBackup\CredObject.xml
$ReturnCode = Invoke-Command -Credential $CredObject -Computername $TestVmIP -ErrorAction Stop -ScriptBlock{
… test script code …
}
exit $ReturnCode